6. How to integrate Collabora Code within Nextcloud
Performing this integration between collabora code and nextcloud, will provide functionality similar to Microsoft Office online. In order to get a smooth experience, it is better to create a separate container running collabora code
Prerequisites:
- You need to have nginx proxy manager setup and domain pointing to it
- You need to have a lets encrypt SSL certificate. And the service cannot be proxied through cloudflare
How to Deploy a Collabora Code Docker Container:
  code:
      ports:
        - '9980:9980'
      environment:
        - "aliasgroup1=https://cloud\\.example\\.com:443"
        #That's the domain of nextcloud which will be authorised by the code container,
        # so make sure you enter the domain of Nextcloud. Do not change anything else there
      container_name: collabora
      restart: always
      image: 'collabora/code:latest'
Now, navigate to your DNS provider, and create an entry that will point to this container, something like collabora.example.com
Open Nginx Proxy Manager, and make sure to acquire a Let's Encrypt SSL Certificate for collabora.example.com.
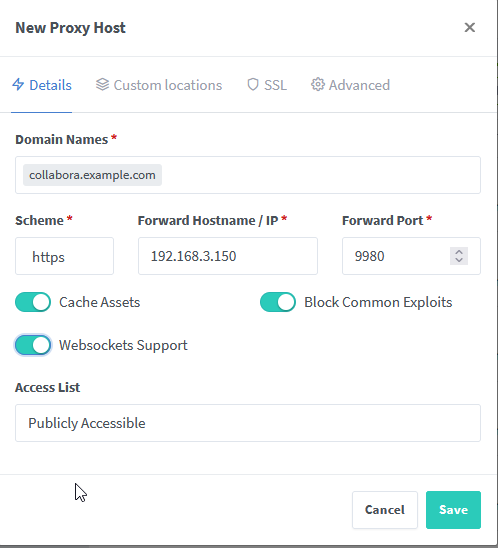
ENSURE THAT SCHEME IS SET to HTTPS, otherwise it will not work
The IP should be the IP of the server, and the port is 9980, as shown in docker compose.
Under Details, ensure websockets support is toggled. UNTOGGLE CACHE ASSETS AND BLOCK COMMON EXPLOITS (ignore pic, my bad)
# static files
location ^~ /loleaflet {
  proxy_pass $forward_scheme://$server:$port;
  proxy_set_header Host $http_host;
}
# WOPI discovery URL
location ^~ /hosting/discovery {
  proxy_pass $forward_scheme://$server:$port;
  proxy_set_header Host $http_host;
}
# main websocket
location ~ ^/lool/(.*)/ws$ {
  proxy_set_header Upgrade $http_upgrade;
  proxy_set_header Connection "upgrade";
  proxy_http_version 1.1;
  proxy_pass $forward_scheme://$server:$port;
  proxy_set_header Host $http_host;
  proxy_read_timeout 36000s;
}
# download, presentation and image upload
location ~ ^/lool {
  proxy_pass $forward_scheme://$server:$port;
  proxy_set_header Host $http_host;
}
# Admin Console websocket
location ^~ /lool/adminws {
  proxy_set_header Upgrade $http_upgrade;
  proxy_set_header Connection "upgrade";
  proxy_http_version 1.1;
  proxy_pass $forward_scheme://$server:$port;
  proxy_set_header Host $http_host;
  proxy_read_timeout 36000s;
}
Once you do that, press save.
How to integrate this into Nextcloud:
- In Nextcloud, login as your admin user, and if you followed my docker compose it would be
ncadmin - In the search bar on the top right, enter Apps
- Click on App Bundles, and scroll down until you can see Nextcloud Office
-
WAIT, DO NOT PRESS INSTALL CODE - BUILT IN CODE EDITOR, THIS WILL CORRUPT YOUR NEXTCLOUD INSTALLATION
- Click on Install to install nextcloud office. Once it is installed, navigate to the settings tab
- On the left menu, under administration, there should now be a new button called Nextcloud Office
- Click on that, and out of the three options click on connect external collabora instance or something similar.
- In the entry box, enter
collabora.example.comand press test. If everything goes well, there will be a bright green tick - Now restart your nextcloud instance, and try to create and edit a new document. If everything is setup correctly, then you should be able to edit your documents!
And With, you have created THE Ultimate Nextcloud Instance with online document editing. Enjoy your fantastic deployment of nextcloud!

